Key Takeaways
-
A 12V ride on car is a battery-powered electric toy vehicle that children can drive, offering a fun and exciting ride that mimics real cars. Familiarizing yourself with its charging needs will help you use it safely and effectively.
-
Charging the car is as simple as plugging the provided charger into the battery pack and a standard outlet. Refer to the manufacturer’s guidelines for charging to prevent damage.
-
Normal charging times are 8 to 12 hours, depending on the current condition of the battery. Avoid overcharging, as this can shorten your battery's life.
-
To ensure the best battery health, be sure to charge the battery after use and store the ride on car in a cool, dry environment. Never fully discharge the battery prior to recharging.
-
If the car still does not charge, inspect the charger, battery connections and power source for any faults. Replace broken or dangerous parts immediately.
-
Charging incorrectly may cause reduced battery life, overheating or permanent damage. Just be sure to use the recommended charger and charging practices.
Charging a 12V ride-on car is an easy task that will keep the ride-on toy ready to roll.
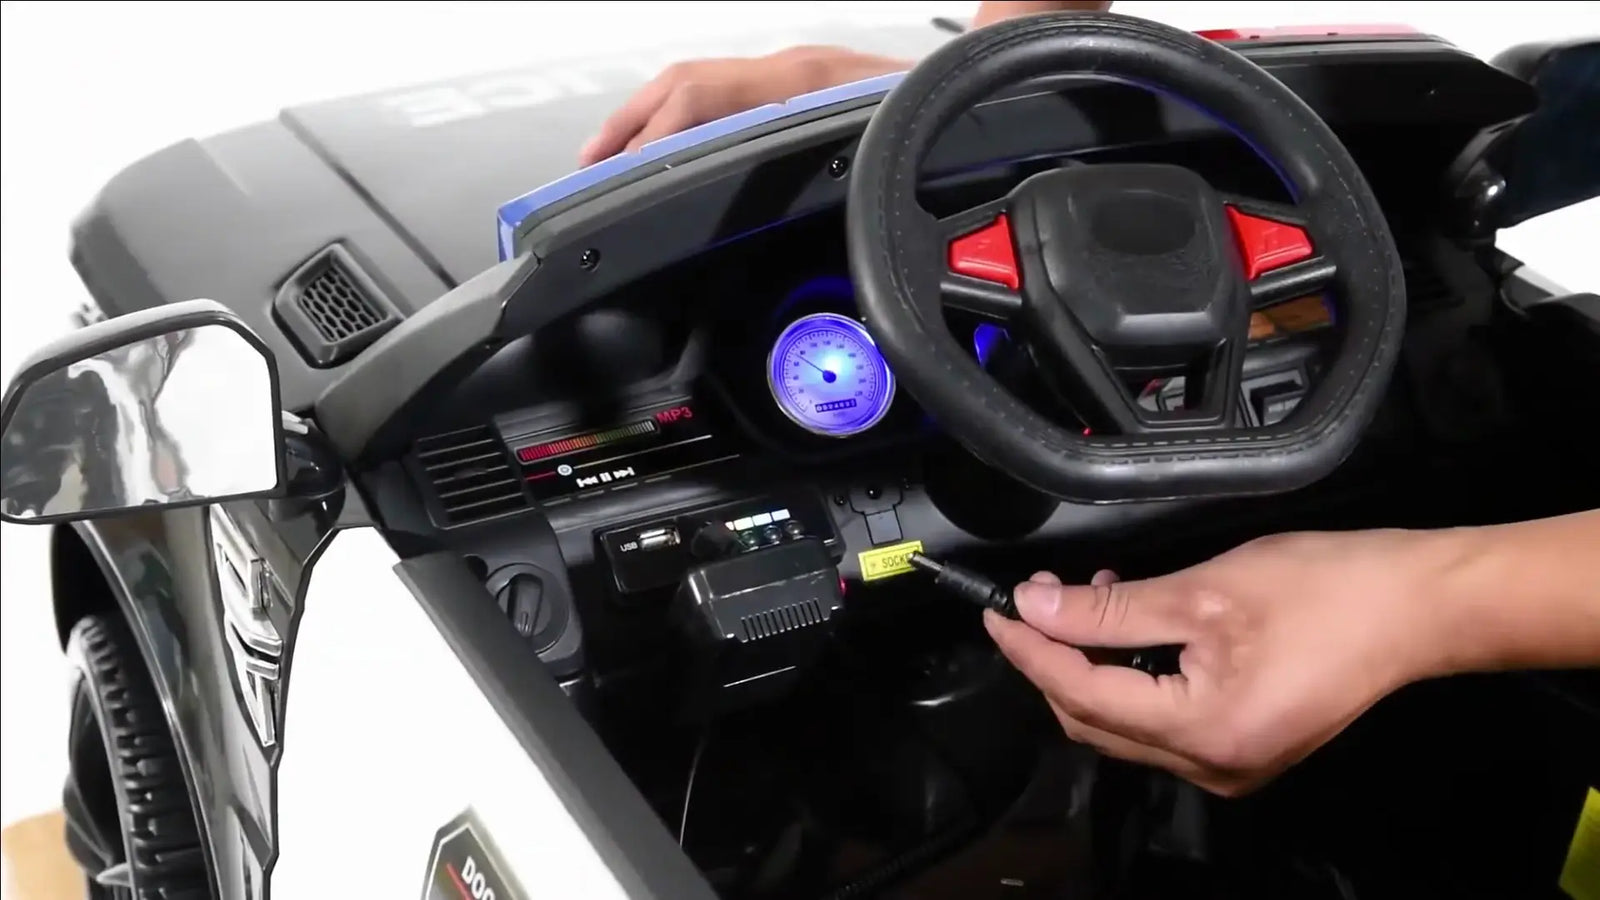
Start by identifying the electric charging port, typically found near the seat or the dashboard area. Attach the charger firmly to the charging port and plug the charger into a regular home wall outlet.
Charge time usually ranges between 8 and 12 hours depending on the model. As always, check and follow the manufacturer’s instructions for safety and best performance.
What Is a 12V Ride-On Car?
A 12V ride-on car is a miniature electric vehicle designed for kids, usually between the ages of 3 to 8 years. These cars operate on a heavy duty 12-volt battery. It gives ample oomph to power tiny motors that spin the wheels and run fun extras such as headlights, horns and built-in music players.
They’re designed to look like real cars, with styles that reflect iconic brands, semi-trucks, or even all-terrain vehicles. Many models come with extremely realistic touches, including functioning doors and adjustable seats. These features, combined with steering wheels, provide an immersive and exciting experience for kids.
No matter the model, these cars are designed for use both inside and out. The included 12V battery provides enough speed and power for the car to drive over grass and rough terrain. It’s great on flat surfaces like driveways, sidewalks, and grassy areas.
Even a basic 12V ride-on car can whiz around at 4 to 5 km/h. This creates an exhilarating ride for children without compromising safety. Many models have parental remote controls, letting an adult steer the car. This feature gives you peace of mind when little kids are in the driver’s seat.
They combine extreme fun with extreme adventure. This method not only allows kids to experience freedom and independence, but does so while providing peace of mind. They’re even more about fun than they are about learning to control and coordinate.

How to Charge a 12V Ride-On Car
Charging your electric 12V ride-on car couldn’t be simpler. If you take these necessary steps, you’ll be able to keep yourself safe and prolong the life of your ride-on car battery.
Begin by referring to the instructions that were included with the car. It typically has charging instructions, including charge time and charger type. If you lost the instruction manual, don’t fret! Typically, most 12V ride-on cars will take anywhere between 8-12 hours to charge from a completely dead battery.
Before you plug the charger in, find the charging port on the ride-on car. It’s usually located behind the seat, or under the hood, depending on the model. First, make sure your car is off completely.
Then make sure to always check that your charger is the right voltage for the car to avoid damaging the vehicle. Only use the stock charger made for the ride-on car. Third-party chargers may not be as compatible or safe.
Keep the charging area dry and protected from extreme heat or cold. For example, charging in a well-ventilated area through a standard household outlet is recommended.
Avoid leaving the battery on the charger longer than the suggested time, since overcharging will reduce battery life.
Charging Times and Battery Life
Full-cycle charging time for a 12V battery is typically in the range of 8 to 12 hours. Ideally, you charge it overnight, so it’s fully charged and ready to go the next day. On your first charge, plan for around 18 hours. This extended time creates an opportunity for the battery to mature and achieve its full potential under a complete charge.
Don’t overcharge your battery, as this could lead to overheating or negatively impact its lifespan. Setting a timer or unplugging it after the suggested cooking time can avoid this.
Battery life is highly dependent on a handful of factors. It’s affected by how often you drive it, what kind of terrain you’re going over, and what it’s hauling. Increased battery per charge is possible when driving on smoother surfaces and lighter loads, which can dramatically increase your battery life per charge.
You can play non-stop for a whopping 1 to 2 hours! Regular maintenance, like cleaning the terminals and storing the car in a cool, dry place, can extend the battery’s overall lifespan. Typically, a well-maintained 12V battery only lasts an average of 1 to 3 years before requiring replacement.
To ensure you maximize the lifespan and performance of your ride-on car, adhere to the manufacturer’s instructions for charging and maintenance.
Tips to Maintain Battery Health
To ensure your ride-on continues to deliver safe, fun, and reliable rides, it’s important to care for its battery. That will keep your child happy and busy for hours! One step we do know is key is preventing overcharging.
We understand it can be convenient to keep the car plugged in. If you keep it plugged in for over 24 hours, it can hurt the battery and reduce its longevity. In much the same way, completely depleting the battery’s power can do permanent damage, causing it to age much more quickly than its normal lifespan.
Use the proper charging time as prescribed in the owner’s manual. Usually, this is around 12 hours for a 12V battery and eight hours for a 6V battery on the initial charge. After that, for day-to-day use, charging the battery all the way before every ride is the best way to go.
This way, your child can fully enjoy their ride-on car experience! Simply don’t overlook remembering to check the manual to ensure the exact charging needs for your model. To further protect the car itself, invest in a cover to keep it protected from the elements or dust.
This simple precaution goes a long way in keeping the car looking good and running well for years to come. With these tips, you’re taking steps to help take care of the battery. That means hours and hours of fun inside and outside are in store for your little one!

Troubleshooting Charging Issues
The most common reason that a 12V ride-on car may not charge properly can usually be blamed on one of three things. The first thing you should look at is the temperature in which you’re operating. Charging in extreme temperatures—below 32°F or above 104°F—may impact the battery’s short- and long-term performance and durability.
Charge the car in a space or environment that does not exceed this threshold. A garage or other well-ventilated area is ideal!
Second, if the vehicle starts, measure the voltage from the music or dashboard display. For a 12V model, the reading shouldn’t go lower than 10 volts. If it does, this may be a sign of a failing battery.
Once the battery is charged to full, use a multimeter to check the voltage of the battery. Allow it to charge for at least 4 hours before taking a reading, as this will give the most accurate reading. If it’s reading 12 volts, your connections and cables are probably good to go. If so, recheck the wiring or replace the battery.
The charger makes a big difference, too. Pick one that is the right voltage, provides a consistent charging rate, and has built-in safety features such as overcharge protection.
Brands you know and models with strong user reviews are a better wager. Remember, charging can take up to 6 to 12 hours, so factor that in too!
Consequences of Improper Charging
Charging a 12V ride-on car may appear simple enough, but cutting corners can result in unnecessary consequences. One of the most prevalent issues is improper battery charging. If you don’t remove the device from the charger after a while, the battery may become hot. This has serious consequences for its capacity to exercise power robustly.
If your manual states an 8-hour charge, follow the instructions. In practice, routinely charging to 12 hours will reduce the lifespan of the battery. A damaged battery also results in diminished playtime and, over time, an expensive replacement.
Undercharging isn’t without consequences. Removing the charger before it finished charging will hurt your battery’s health. Treat it like any portable laptop, and charge it afterwards so it’s ready to go the next time.
This can lead to erratic behavior, such as the car suddenly stopping or operating at a lower speed than expected. If the car has a typical two-hour range, improper charging can significantly impact that range. We know this is a frustrating scenario for kids and caregivers alike.
This is a third common charging mistake. Using chargers with the wrong voltage or amperage can either ruin the battery or potentially destroy the car’s electrical systems. Always use the charger that came with your device—or one that’s recommended by the device manufacturer—for best performance and safety.